A story about art history.

A story about art history.

A good friend invited me to join him on his quest to learn French, so I said, “Sure!”—as you would. I suggested, instead of learning a bunch of French words, how about we learn the history of art in French, so it’s more interesting? Part of the deal was me proving to myself I could put an e-learning package together in Adapt, a great tool I’ve known for years but never got to properly use until now.

Leonardo painting the Mona Lisa.

A few prompts down and bam! The bot got it just right.

It wasn’t quite the case with Leonardo and La Gioconda above. With this one I started with Consistent Character and ran the prompt about five times, and it was close but not quite there. So I took it to ChatGPT: no luck. Tried Gemini: same, no luck. Took it to Gwen, and it worked in the second iteration. Sounds painful, but that was actually a few minutes. There it was, Leonardo painting the Mona Lisa. Just like that—type, type, click, done.

The damn bot draws way better than I ever could. And fast!

Michelangelo sculpting the Pieta.

History of Art (from the history lens)

I didn’t want a training where you see a bunch of information, some paintings with their authors, dates, locations, etc. That’s purely data, and we don’t learn like that. We learn better when we can make connections. So, my approach was to look in the history and learn the forces behind the canvas.

Adapt framwork art history
Adapt framwork – l’histoire de l’art

For instance, why does the Romanesque architecture seem so bleak and simple? Why do the churches look like fortresses? It’s because quite often they needed to act like one. The violence was rampant and the raids happened often, so the churches had really thick, unshakable walls. They were there to offer protection. That is the kind of information that helps you understand what drove the artists to do what they did, e.g., power shifts, war, plague, etc. Why did Raphael paint so many religious pieces? Because a lot of them were commissioned by the pope and funded by the Vatican, that’s why.

Raphael
Raphael didn’t break rules – he perfected them.

More to follow :)

Using motion capture in Blender

Using motion capture in Blender

In the e-learning space, one of the things that I really enjoy is being able to work with characters. Luckily, video-based character-led training is a popular choice, so I get to put this old passion to good use.

Considering production time (and cost) can be a deal-breaker for choosing 3D animation as an option, I’m always on the look for better ways to accelerate the process. Motion capture, often referred to as mocap, is a good example. After a long time trying to figure out a way to use it, without much hassle, I finally got it to work. This is my test animation. Ahmed here is doing his happy dance, celebrating our new workflow, for those times when mocap can save you hours of animation work. Although I enjoy animating, good use of time is still a key component of any successful project.

And that is Sissy, an SIS expert that will provide the intelligence team with invaluable spatial information. She agrees mocap is very cool and couldn’t help doing her happy dance too.

Character animator and other solutions

Character animator and other solutions

While trying to figure out a way to meet the tight deadlines for the training courses we have on, after a bit of research, I’ve started testing the lip sync features of Character Animator, one of the newish apps Adobe has made available through CC. Turns out, it works like magic, the team really liked the results and was happy to add it to the workflow.

If anything, perhaps not as cool as the actual 3D mouths, in my view, but it’s a way faster process and will save us loads of time (equals budget). Pretty decent compromise to get the issue solved and the project delivered on time.

Groo the Wanderer in 3D

Groo the Wanderer in 3D

Here’s my first attempt on an old favourite character, Groo, from the brilliant Sergio Aragonés. It’s a side project I’ve been considering for a while but too often kept hitting a wall with both rigging and rendering. Did I err? said the Wanderer. Well, not this time.

I was pretty happy to manage the whole thing in Maya, using its human IK and rendering it with Arnold. Groo does what Groo does best!

ZBrush speed sculpting

ZBrush speed sculpting

This is the end result of a 3D character I did based on a speed sculpting tutorial from Shane Olson and a sketch made by Dean Yeagle. It’s also my debut in working with Dynamesh geometry, a pretty amazing tool. I’ve worked on many 3D character before but nothing like this one, with the speed and flexibility it offers. Below, a work in progress.

If you don’t know what Dynamesh is, in short, it’s a technology that allows you to re-design the geometry on a 3D model, on the fly, re-mesh it, as if you’re working with real clay – although you could also say it feels a bit like magic. It’s been years, I’ve been hearing how great it is and now I finally got to have a taste of its power. So good.

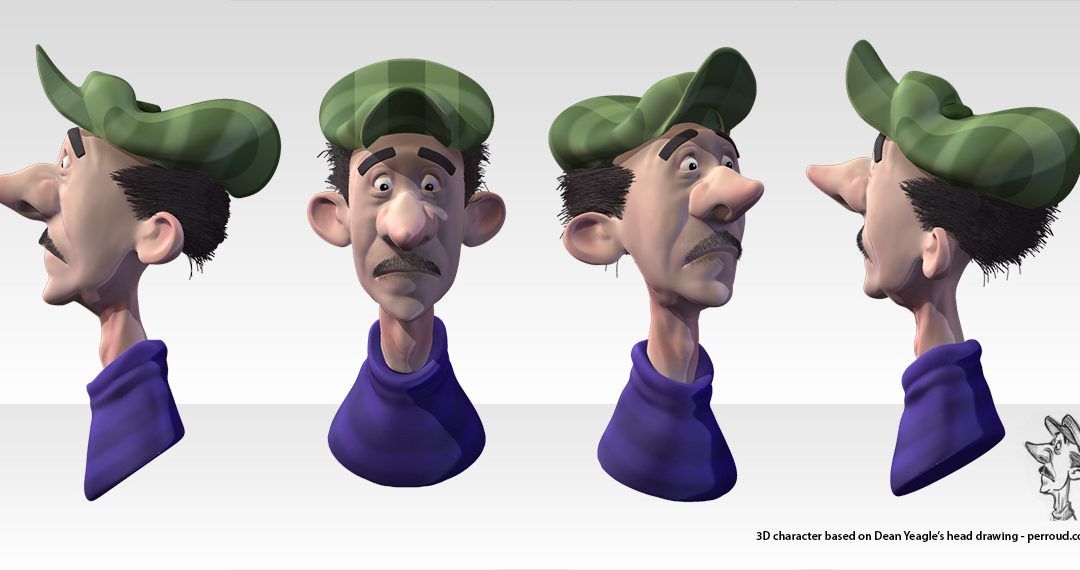
More info for those who work with or are studying ZBrush

I’ve been working on this cartoon character for weeks, not because it’s super difficult or anything – but because I couldn’t figure out why PolyPaint wasn’t working. If you search the internet, most posts discussing this issue will tell you it’s because the layer is on record mode. But I haven’t had setup any layer, let alone activated record mode, so no clear answer to me. Long story short, the problem was that, for whatever reason, my brush was using the secondary colour, which as white.

Turns out, white colour won’t show at all, no matter which shader you’re using, so it seems to act more like an eraser rather than white ink. Ok, you’re probably thinking “rookie mistake”, but… ok yes, I see now that was rookie. However, on my defence I will say, that’s not intuitive. I did post the issue on both PluralSight, where I got the tutorial from, and also Facebook and GooglePlus. I got one good answer from the tutorial owner, which didn’t solve the problem, and not one answer with a plausible solution from the social media.

So there it is, if you were stuck with PolyPaint like I was, try checking your secondary colour. Or try painting with OPTION key pressed. Hope it helps someone else too.

The Gourmandiser Heads

The Gourmandiser Heads

A caricature I did of 2 clients I happen to be good friends with. I was experimenting with the 3D sculpting tools in Blender, and needed some victims – although when I asked them I said “models”, obviously. They’re Juliana and Charles, the heads of The Gourmandiser, a local distributor of amazing food to some of the top names in the dining and hospitality industry in Adelaide.